Creating a folder structure in studies and mytabs lists
Study And Tab Folders
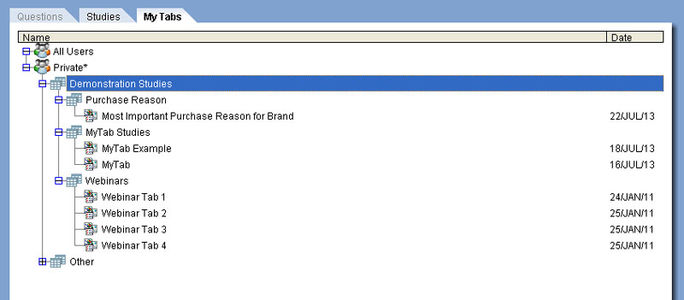
Creating folders for grouping studies or saved tabs keeps the study and saved tab layouts well organized. The following article is broken up into three sections: Creating a Single Folder, Creating Multiple Levels of Folders (starting from the top and working down), and Creating Subfolders (creating a folder within an existing folder). Creating folders for saved tabs uses the same steps as study folders. Follow the same steps for study folders when creating and organizing saved tabs in the My Tabs section of mTAB.
To Create a Single Study Folder:
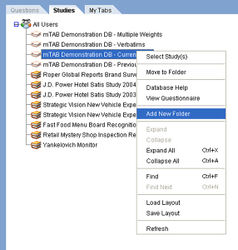
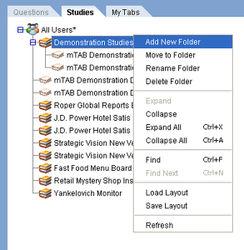
Select a study, Right-click on it and select Add New Folder.
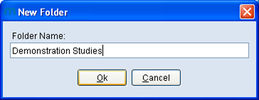
Give your new folder a name, then click OK.
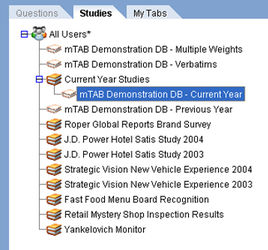
A new folder is added. Study folders can also be moved by dragging them above, below, or in the middle of the existing list of studies.
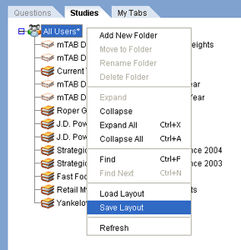
Note the asterisk that now appears at the top of the studies list. An asterisk indicates that a change to the layout has occurred and these changes need to be saved. Otherwise, any new folders added to the layout will be lost.
Right-click and select Save Layout.
The asterisk should have gone away, indicating all changes to the layout were saved.
Note: In addition to the Save Layout option, the Save Group Layout option may be available in the menu. There are two study layouts in mTAB, a "Group Layout" that is the default layout for everyone and a "Private Layout", which is your own. If you have access to the Save Group Layout feature and you are in charge of a certain part of the mTAB administration at your company, you may use the Save Group Layout feature which will save your changes for yourself and everyone else.
To Move Studies Into the Folder:
Click and drag the study or studies on top of the newly created folder. Release your mouse and the study or studies should now appear indented to the right to indicate that they're within the folder. You can then click the plus sign [+] to collapse or expand the folder.
Right-click and select Save Layout. The asterisk should have gone away, indicating all changes to the layout were saved.
Repeat the previous steps to create as many folders as needed.
Multiple Levels Of Folders
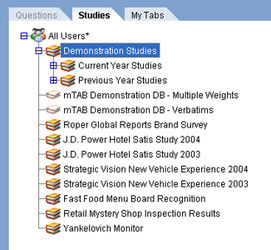
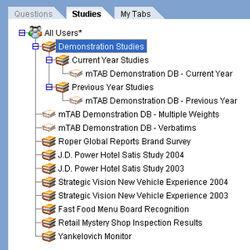
mTAB also supports multiple levels of study folders. With this feature, it is possible to create nested folders or a study folder hierarchy. In our previous example, we were working with a study named mTAB Demonstration DB - Current Year. We created a study folder named Current Year Studies and moved our study into this folder.
The next example will use 2 study folders. We can organize the study folders further by creating multiple levels of folders or nested folders.
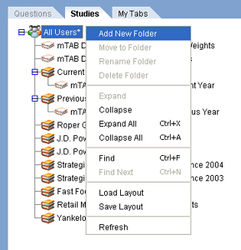
First, right-click on your Group Icon and select Add New Folder.
Give your new folder a name, then click OK.
A new folder is added. This will be the top folder in the Study Folder hierarchy. If your new Study folder appears inside of another folder, it can be rearranged by dragging it out. All other folders will be moved to appear nested within the newly created folder. Note the asterisk that now appears at the top of the studies list.
Right-click and select Save Layout.
To Move Study Folders Into the Top Folder:
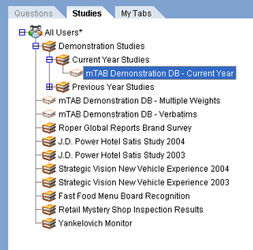
Click and drag the study folder on top of the newly created folder. Release your mouse and the study folder along with the study or studies should now appear indented to the right to indicate that they’re within the top folder. You can then click the plus sign [+] to collapse or expand the folder.
Repeat the previous steps to move as many study folders into the top study folder as needed. Multiple leveled study folders have now been created. To save the new folders, right-click and select Save Layout. The asterisk should have gone away, indicating all changes to the layout were saved.
Subfolders Within an Existing Folder
The previous example illustrated how to create multiple level study folders or nested folders. Creating a new folder or a subfolder within an existing folder uses a similar process.
The next example will create 2 subfolders within an existing study folder. We can organize an existing study folder further by creating subfolders.
Right-Click on the existing study folder that the subfolder should be included in. Select Add New Folder.
Give your new folder a name, then click OK.
A new subfolder is added. This will be the folder that the study will be placed in. If your new subfolder appears inside or outside of another folder, it can be rearranged by dragging it to the proper place. Note the asterisk that now appears at the top of the studies list.
Repeat the steps to create another subfolder.
Right-click and select Save Layout.
To Move Studies Into the Subfolders:
Click and drag each study on top of the newly created subfolder. Release your mouse and the study should now appear indented to the right to indicate that it’s in the subfolder. You can then click the plus sign [+] to collapse or expand the subfolder.
Repeat the previous steps to move as many studies into subfolders as needed.
Right-click and select Save Layout. The asterisk should have gone away, indicating all changes to the layout were saved.
To Create Folders In the My Tabs Pane:
Creating folders for saved tabs uses the same steps as creating folders for studies. Refer to the previous sections and perform the folder creation steps in the My Tabs section of mTAB.
